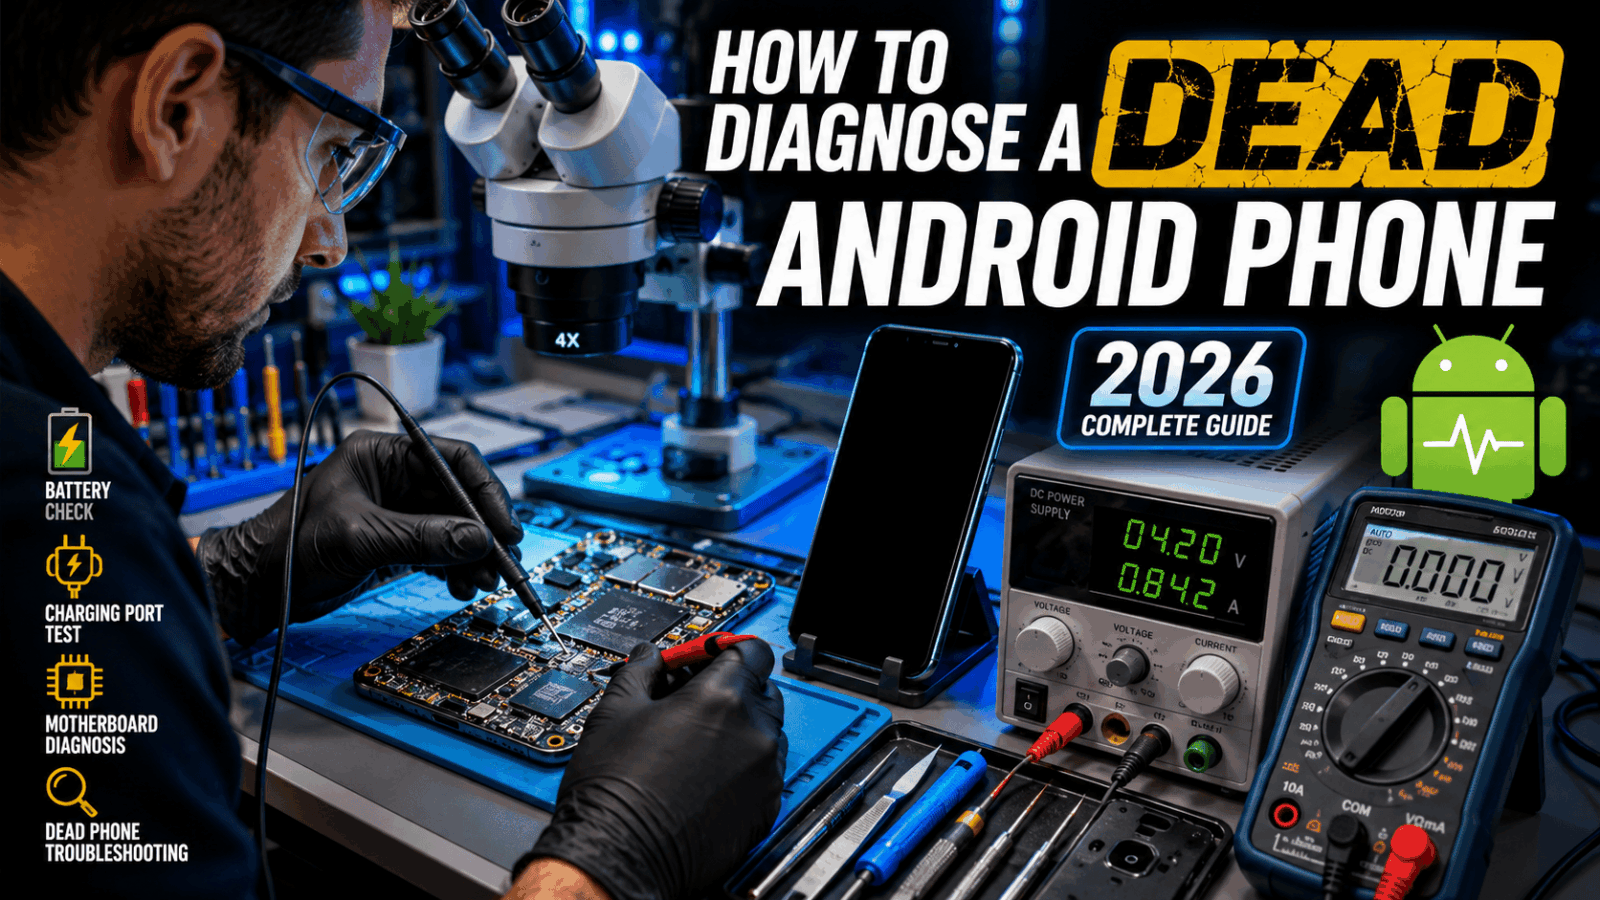
How to Diagnose a Dead Android Phone
A dead Android phone can be one of the most frustrating problems for any smartphone owner or repair technician. One moment the device is working perfectly, and the next it refuses to turn on, charge, or even show a logo. Many people immediately assume the phone is completely destroyed, but in reality, a large percentage of “dead” phones can be repaired with proper diagnosis. The key is identifying the exact cause before replacing parts unnecessarily. Think of the phone like a car that won’t start. You wouldn’t replace the entire engine without checking the battery, fuel system, and starter first. The same logic applies when troubleshooting Android devices.
The modern Android smartphone contains dozens of interconnected components. A failure in the battery, charging circuit, display, power button, or motherboard can all create similar symptoms. This makes diagnosis more important than the repair itself. A technician who correctly identifies the fault saves both time and money. Throughout this guide, you’ll learn how to diagnose a dead Android phone using professional techniques and practical troubleshooting methods suitable for beginners and experienced technicians alike.
Understanding What a Dead Android Phone Means
The term “dead phone” is often misunderstood. In technical repair terms, a dead Android phone is a device that shows no signs of life. It may not vibrate, charge, display a logo, or respond to button combinations. However, not every phone that appears dead is actually dead. Many devices suffer from software crashes, damaged screens, or faulty batteries that create the illusion of a completely failed device.
One of the first tasks during diagnosis is determining whether the problem is hardware-related or software-related. A phone with a black screen may still be running in the background. Notifications, vibration, or connection to a computer can indicate that the motherboard is functioning correctly. On the other hand, a phone that draws no charging current and remains completely unresponsive may indicate a deeper hardware issue.
Understanding this distinction prevents unnecessary motherboard repairs. Technicians often discover that what appeared to be a catastrophic failure was actually a simple battery replacement or charging-port repair. By carefully observing symptoms before disassembly, you can significantly improve repair success rates and avoid costly mistakes.
Common Symptoms of a Dead Device
Some of the most common symptoms include:
| Symptom | Possible Cause |
|---|---|
| No charging indication | Battery or charging IC |
| Black screen | Display or motherboard |
| Stuck on logo | Software corruption |
| No vibration | Power circuit failure |
| Heating during charging | Short circuit |
Recognizing these symptoms provides valuable clues that guide the rest of the diagnostic process.
Why Android Phones Suddenly Stop Working
Android phones rarely die without a reason. In most cases, there are underlying hardware or software failures that develop over time. Understanding these causes helps technicians narrow down potential faults more quickly. Hardware failures are generally more severe because they involve physical components, while software failures can often be resolved through flashing or recovery procedures.
Battery degradation remains one of the most common causes. Lithium-ion batteries naturally lose capacity after hundreds of charge cycles. Over time, voltage instability can prevent the phone from powering on correctly. Similarly, charging ports wear out due to repeated cable insertion and exposure to dust, moisture, and debris.
How to Fix a Damaged Charging Port on Any Smartphone (2026 Guide)
Software issues can also cause apparent death. Failed updates, corrupted firmware, boot-loop errors, and malware infections may prevent Android from loading. In these situations, the device may still respond to recovery mode or fastboot mode. Identifying whether the problem is hardware or software significantly affects the repair strategy and determines which tools are required.
Hardware Causes
Hardware-related causes include battery failure, charging-port damage, motherboard shorts, liquid damage, power IC defects, and damaged connectors. Physical impacts often crack solder joints or damage integrated circuits. These issues typically require specialized tools and repair expertise.
Software Causes
Software failures commonly involve corrupted firmware, interrupted updates, failed rooting attempts, and operating system crashes. These issues often respond to firmware flashing or factory recovery procedures.
Initial Checks Before Opening the Phone
Before removing a single screw, several important diagnostic checks should be performed. Many repair technicians rush directly into disassembly, which can waste valuable time and even introduce new problems. Initial external inspection often reveals obvious clues that point directly to the fault.
Start by examining the phone for signs of physical damage. Look for cracked screens, bent frames, water indicators, or evidence of impact. Pay special attention to charging-port alignment and battery swelling. Swollen batteries can create internal pressure that damages connectors and displays.
Next, connect the phone to a known-good charger and cable. Observe whether the device vibrates, heats slightly, or displays any charging symbols. If available, use a USB power meter to monitor current draw. Current consumption patterns often reveal whether the device is attempting to boot or suffering from a short circuit. These simple checks provide valuable information before advanced diagnosis begins.
Diagnosing Battery-Related Problems
The battery serves as the heart of every smartphone power system. Without sufficient voltage, the motherboard cannot initialize properly. Battery-related failures are among the easiest problems to diagnose and repair. A degraded battery may still accept charge but fail to provide stable power during startup.
One effective method is measuring battery voltage using a digital multimeter. Most lithium-ion smartphone batteries operate between 3.7V and 4.4V. Batteries below approximately 3.0V may enter deep discharge protection mode. In such cases, the phone may appear completely dead even though the battery can sometimes be recovered.
Technicians should also inspect battery connectors for corrosion or physical damage. Loose connections can interrupt power delivery and mimic motherboard faults. When possible, testing with a known-good replacement battery is one of the fastest ways to confirm battery-related issues.
Signs of a Faulty Battery
Common warning signs include:
- Battery swelling
- Rapid discharge
- Overheating
- Random shutdowns
- Failure to charge beyond certain percentages
These symptoms often appear weeks before complete battery failure occurs.
Checking the Charging Port
The charging port is another frequent failure point. Dust accumulation, bent pins, corrosion, and physical wear can prevent charging altogether. Since charging problems often mimic dead-phone symptoms, careful inspection is essential.
Use magnification tools to inspect the charging connector. Look for missing pins, debris, oxidation, or signs of liquid exposure. Even a small amount of dirt can block electrical contact and prevent charging. Cleaning should be performed carefully using appropriate tools to avoid damaging delicate connectors.
Technicians can also measure voltage at charging-port test points to confirm whether power is reaching the motherboard. If voltage enters the port but fails to reach charging circuits, additional motherboard diagnosis may be required.
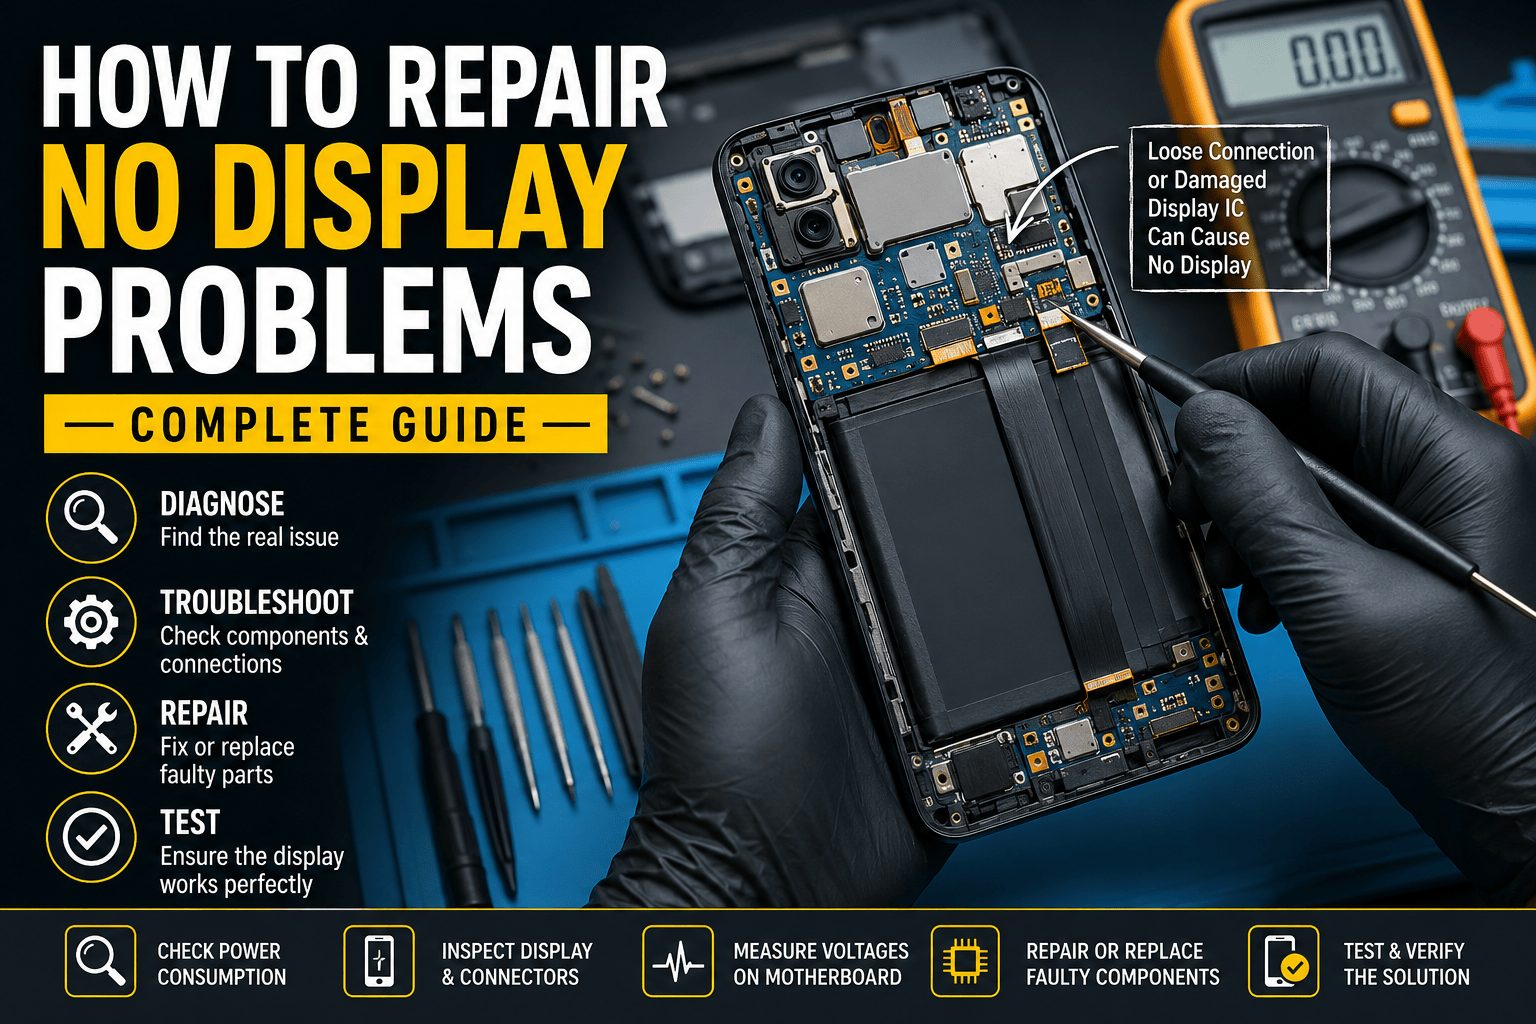
Diagnosing Display Issues
Many “dead” phones are actually functioning normally but suffer from display failures. This distinction is extremely important because display replacement is far simpler and less expensive than motherboard repair. A black screen does not automatically mean the phone is dead.
How to Repair a Battery Connector on an Android Phone (2026 Guide)
Press the power button and listen carefully. Vibrations, notification sounds, and charging tones indicate that the operating system is likely running. Connecting the device to a computer may also confirm activity. If the computer detects the phone, the motherboard is probably operational.
Display failures can result from cracked OLED panels, damaged flex cables, faulty display ICs, or liquid damage. Testing with a replacement screen often confirms the diagnosis quickly. This simple step can prevent unnecessary motherboard repairs and significantly reduce repair time.
Testing the Power Button Circuit
The power button acts as the gateway between the user and the phone’s startup sequence. A damaged power button can make a perfectly functional phone appear completely dead. Because of this, technicians should never overlook button-related diagnosis.
Begin by physically inspecting the button. Does it click normally? Does it feel stuck or loose? A damaged button may fail to complete the electrical circuit required to initiate startup. Using a multimeter, technicians can test continuity across button contacts.
Some Android phones support automatic startup when connected to a charger. If the device powers on through charging but not through the button, the power-button circuit becomes a primary suspect. Repair may involve replacing the button assembly or repairing damaged motherboard traces.
Diagnosing Motherboard Faults
")
Motherboard failures represent the most complex category of dead-phone diagnosis. The motherboard contains critical power-management circuits, processors, memory chips, and communication components. Failures in these areas often require advanced diagnostic equipment and micro-soldering expertise.
One common fault involves the Power Management Integrated Circuit (PMIC). This chip distributes voltage throughout the device. When it fails, the phone may show no signs of life despite a healthy battery and charging system. Thermal cameras and power-supply tools help technicians identify abnormal heat generation associated with PMIC failures.
Short circuits also frequently occur on smartphone motherboards. A shorted capacitor can prevent startup and cause excessive current draw. Using a DC power supply and thermal imaging allows technicians to locate faulty components quickly. Successful motherboard diagnosis often depends on experience, patience, and systematic testing.
Using Professional Diagnostic Tools
Professional repair technicians rely on specialized tools to improve accuracy and efficiency. While basic repairs can be performed with simple equipment, advanced diagnosis requires more sophisticated instruments.
Useful diagnostic tools include:
| Tool | Purpose |
| Digital Multimeter | Voltage and continuity testing |
| DC Power Supply | Current draw analysis |
| USB Power Meter | Charging diagnostics |
| Thermal Camera | Short-circuit detection |
| Microscope | Component inspection |
| Oscilloscope | Signal analysis |
Each tool provides valuable information that helps technicians isolate faults. Investing in proper equipment often pays for itself through faster repairs and improved success rates.
Step-by-Step Dead Phone Troubleshooting Process
A structured troubleshooting process increases diagnostic accuracy. Start with the simplest possibilities before progressing to advanced repairs. This approach minimizes wasted effort and reduces the risk of damaging functional components.
First, verify the charger, cable, and power source. Next, inspect the charging port and battery condition. Measure battery voltage and test with a replacement battery if available. Check for charging current using a USB power meter. Observe vibrations, sounds, or computer detection that might indicate display-related issues.
If basic tests reveal nothing, proceed to motherboard diagnosis. Measure voltage rails, inspect for shorts, and analyze current draw using a DC power supply. By following a logical sequence, technicians can systematically eliminate possibilities until the root cause is identified. This method mirrors detective work, where each clue brings you closer to solving the mystery.
When to Repair or Replace the Device
Not every dead Android phone is worth repairing. The decision depends on repair cost, device age, replacement value, and parts availability. Sometimes a simple battery replacement can restore a phone to perfect condition for minimal cost. Other times, extensive motherboard damage may exceed the value of the device.
Consider repair costs carefully. If the motherboard requires multiple component replacements and labor costs approach the price of a newer device, replacement may be the better option. Business users should also consider downtime and data recovery requirements when making decisions.
For technicians, transparency is essential. Providing accurate diagnostic reports helps customers make informed choices. A successful repair is not only about fixing the device but also about delivering value and maintaining trust.
Advanced Motherboard Diagnostics for Dead Android Phones
When basic troubleshooting fails to identify the cause of a dead Android phone, attention must shift toward the motherboard. This stage separates beginner technicians from professionals because motherboard diagnosis requires deeper technical understanding and more precise testing methods. The motherboard acts as the brain and nervous system of the device. Every major function, from charging and booting to display output and network communication, passes through it. If a critical component on the motherboard fails, the phone may become completely unresponsive.
One of the first techniques professionals use is current draw analysis with a DC power supply. By connecting the motherboard directly to a regulated power source, technicians can observe how much current the board consumes during startup attempts. A normal board usually shows specific current patterns as it moves through different boot stages. If the current remains at zero, there may be an open circuit. If it jumps immediately to a high value and stays there, a short circuit is likely present. These patterns provide important clues without replacing a single component.
Thermal cameras have become increasingly popular in smartphone repair shops because they allow technicians to visualize heat generation. A shorted capacitor or damaged integrated circuit often heats up faster than surrounding components. Instead of spending hours manually searching the board, technicians can identify the problem area within minutes. This technology has dramatically improved repair efficiency and reduced unnecessary component replacement.
Identifying Short Circuits on the Motherboard
Short circuits are among the most common causes of dead Android phones. A short occurs when electricity takes an unintended path, preventing the motherboard from functioning correctly. Water damage, physical impact, manufacturing defects, and power surges can all create shorts. The challenge lies in locating the exact component responsible.
A common diagnostic method involves injecting low voltage into the affected power rail and observing which component heats up first. This process must be performed carefully because excessive voltage can damage the board further. Once the faulty component is identified, it can usually be replaced with micro-soldering equipment. In many cases, replacing a single capacitor costing only a few cents can revive an otherwise dead smartphone.
Technicians should also inspect areas around the charging IC, power management IC, and battery connector. These sections handle significant electrical loads and are particularly vulnerable to damage. Patience is essential during this process because rushing often leads to incorrect diagnosis and additional repair complications.
Water Damage Diagnosis
Liquid damage remains one of the leading causes of smartphone failure worldwide. Even water-resistant devices can suffer internal corrosion if seals deteriorate or the device experiences significant exposure. The tricky part is that water damage symptoms may appear immediately or several weeks later. A phone that seemed fine after being dropped in water may suddenly stop working due to gradual corrosion spreading across critical circuits.
During diagnosis, technicians should carefully inspect liquid damage indicators located inside the device. These indicators change color when exposed to moisture and provide a quick clue about potential water intrusion. However, visual inspection alone is not enough. Corrosion often develops underneath integrated circuits where it cannot be seen without magnification.
The repair process typically begins with ultrasonic cleaning or specialized PCB cleaning solutions. Removing corrosion can sometimes restore functionality without replacing components. In more severe cases, damaged chips, connectors, or traces must be repaired. Water damage diagnosis requires meticulous attention because multiple faults can exist simultaneously.
Diagnosing Software-Related Dead Phones
Not every dead Android phone suffers from hardware failure. Software corruption can create symptoms that look identical to motherboard problems. Failed updates, interrupted flashing procedures, malware infections, and corrupted partitions can all prevent Android from booting successfully.
The first step is determining whether the phone can enter recovery mode, fastboot mode, or download mode. Different manufacturers use different key combinations, but accessing these modes indicates that core hardware components are still functioning. This dramatically changes the repair strategy because software solutions become possible.
Firmware flashing is often the preferred repair method for software-related failures. Using manufacturer-approved firmware and flashing tools can restore corrupted operating systems and return the phone to working condition. Technicians should always verify the correct model number and firmware version before flashing because incorrect software can worsen the problem.
Common Software Symptoms
Software-related dead phones often display:
| Symptom | Likely Cause |
|---|---|
| Boot loop | Corrupted system files |
| Stuck logo | Failed update |
| Recovery mode only | Damaged Android partition |
| Fastboot mode access | Software corruption |
| Random reboots | Firmware instability |
Recognizing these patterns helps determine whether hardware repairs are necessary or if software restoration will solve the issue.
Using USB Current Draw Analysis
Current draw analysis is one of the most powerful diagnostic techniques available to mobile repair technicians. A USB power meter allows technicians to measure exactly how much power the phone consumes while charging or attempting to boot. These measurements provide valuable clues about internal conditions.
For example, a phone drawing absolutely no current may indicate a damaged charging port, disconnected battery, or open circuit. A device drawing moderate current but failing to boot could indicate software issues or display problems. Excessively high current draw often suggests short circuits or damaged power management components.
Experienced technicians often memorize current draw patterns associated with specific faults. This skill develops over time and can dramatically speed up diagnosis. Instead of guessing which component failed, technicians can use objective electrical measurements to guide their decisions.
Essential Tools Every Mobile Repair Technician Should Own
Proper diagnosis depends heavily on having the right equipment. While beginners can start with basic tools, professional-level repairs require a more advanced toolkit. Investing in quality diagnostic equipment increases repair success rates and reduces wasted time.
The following tools are considered essential:
| Tool | Importance |
| Digital Multimeter | Essential |
| Screwdriver Set | Essential |
| DC Power Supply | Professional |
| USB Power Meter | Essential |
| Hot Air Station | Professional |
| Microscope | Professional |
| Thermal Camera | Advanced |
| Soldering Station | Professional |
These tools allow technicians to move beyond guesswork and perform accurate diagnosis. Even simple measurements can reveal problems that would otherwise remain hidden.
Preventing Dead Android Phone Issues
While diagnosis and repair are valuable skills, prevention remains the best solution. Many dead-phone cases result from avoidable issues such as poor charging habits, low-quality accessories, and neglecting physical damage. Educating users about proper device care can significantly reduce repair frequency.
High-quality chargers should always be used because unstable voltage can damage charging circuits over time. Protective cases help reduce impact damage, while regular cleaning prevents charging-port contamination. Avoiding extreme temperatures is also important because excessive heat accelerates battery degradation and stresses motherboard components.
Software maintenance matters as well. Keeping Android updated, avoiding untrusted applications, and performing regular backups reduces the likelihood of software-related failures. Small preventive measures can extend a phone’s lifespan by several years.
Professional Tips for Faster Diagnosis
Successful technicians follow a repeatable process. They avoid assumptions and gather evidence systematically. One of the biggest mistakes beginners make is replacing parts without proper testing. This approach increases costs and often fails to solve the original problem.
A good rule is to start with the most common failures first. Batteries, charging ports, and displays account for a large percentage of dead-phone cases. Only after these possibilities are eliminated should motherboard-level diagnosis begin. This structured approach minimizes unnecessary work and improves efficiency.
Keeping detailed repair notes also helps. Over time, technicians develop a database of recurring faults across different phone models. This experience becomes a valuable resource when diagnosing future devices. What once required hours of testing may eventually take only minutes because similar symptoms have been encountered before.
Final Thoughts
Diagnosing a dead Android phone is a skill that combines observation, technical knowledge, and logical thinking. Every repair begins with understanding the symptoms and following a structured troubleshooting process. From simple battery failures to complex motherboard shorts, each problem leaves clues that can guide the technician toward the correct solution.
The most successful repairs happen when technicians resist the urge to guess. Instead, they test, measure, verify, and proceed methodically. Whether you’re repairing phones professionally or learning mobile hardware repair as a hobby, mastering diagnostic techniques will save time, reduce costs, and improve repair success rates.
A dead Android phone may look hopeless at first glance, but with the right tools, knowledge, and patience, many devices can be brought back to life. The key is understanding where to look, what to test, and how to interpret the results.